Presenting through Zoom from my Galisteo Street Studio in Santa Fe, NM a series of demos are available for you to engage from your own studio. Participants can interact during each presentation and individualized “confer and critique” sessions can be scheduled in addition.
As a pre-requisite please view this orientation video to learn about Zoom and to help in arranging your own studio to best present. You may also be interested in viewing the Materials list. Zoom presentations are recorded and will be available to all participants. NOTE: ALL TIMES LISTED ARE MOUNTAIN (MT- DENVER)
Custom services are available as well.
No upcoming online programs and remote services currently scheduled
Past Online Programs
zoom videos are available for most past online programs
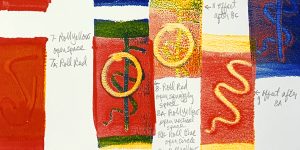
In the best of moments the creative process is largely a right-brain activity. The concept of being “in the zone,” is a place where action simply happens. The mark I’m making did not come from thought but rather as an instantaneous response to the last mark I made. And the color I choose seems to come from an otherworldly place. Time does not exist and I am unaware of anything else going on around me. There is no right or wrong only spontaneous action. It’s kind of an unconscious state. Oddly though this intense focus seems to vanish as soon as I notice it. What just happened? The left-brain enters and thought takes over. I become more conscious of what I am doing and now choice and questions enter into the situation. “You can’t think and hit at the same time,” Yogi Berra. Betty Edwards in her book “Drawing From the Right Side of the Brain” uses the technique of drawing or painting what you see rather than what you know.
So how do we reconcile this and try to stay in the right-brain focus? I’m not sure we can. Nor should we. But what we can do is to be prepared for how to embrace our left-brain intrusion.
Although the right brain is where the feeling comes from the left brain is where the technical abilities are. After all the greatest works of art have both technical ability and feeling. A technically perfect painting with no emotion is static. An emotionally charged work with no skill is a mess. Thus, strong communication between the hemispheres is what makes an artist great.
In this short online webinar hosted by Eddie Soloway I will offer some ideas about how to be prepared and stay focused to move through the barriers that our left brains throw up.
I will elaborate about the 3 C’s- Craftsmanship, Content and Composition and show some illustrated cues to create depth and contrast in a two dimensional composition.
Embrace the element of surprise- use accidents and gifts as a way to shake things up.
Our intention is to make problems for ourselves so we can come up with creative solutions- keep the excitement of not knowing.
Referencing the concept of having a conversation with the piece, don’t go looking for easy solutions- just keep responding to the information coming back at you and the easy solutions will simply appear.
For about the cost of a movie and popcorn this program will be filled with gems of information. Click the button below to register.

A veil is a great way to reduce previously printed imagery. 
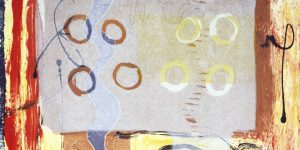
Similar to using white paint in a painting, a veil can be used in printmaking with great flexibility to soften or eliminate information.
There are a number of ways to use textures in a monotype composition. This demo will show you the advantages to using particular methods depending on your project.
This 2 hour interactive demo includes questions from participants followed by optional 30 minute individualized Confer and Critique Add-On sessions that may be purchased in advance below or at checkout. Additional hour long Confer ‘n Critique sessions may be scheduled by appointment. Please see the recommended supply list below.
For a full hands-on engagement you will need the following:
- A monotype work station complete with a palette, Akua inks and solvents, monotype plates, brayers and other accessories. See the complete materials list.
- A monotype work in progress- preferably one that has more information than desired and has had a day or two to dry
- A FRESH jar of Akua Opaque white (older jars of Opaque White tend to be too stiff). Titanium White will work as well.
- A sharpie marker
- Some Q- tips
- Newsprint
- Various textured items for example, corrugated cardboard, textured fabric, leaves, a doily, wallpaper with raised patterns, string, etc.
- A sheet or two of Arches 88 paper
- A press (preferred) or hand printing station

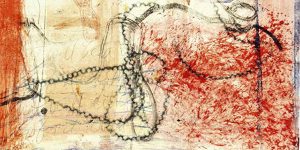
Contact, Transfer or Trace monotype all refer to the same process of creating printed marks on paper. It’s a great way to make graphic imagery with a printerly feel.
Many of us remember when we wanted to make a carbon copy on the typewriter. And the time we put the carbon paper in backwards? The result was a reverse impression on the back of the original. Well that’s kind of what happens here. Paper is laid on top of an inked plate. An image is drawn or impressed onto the back side of the paper. When the paper is lifted the resulting impression is the printed image in reverse. You will learn about ink preparation, experimenting with various papers and mark making instruments as well as the many applications for this process. This program is suited to all levels of experience and no press is necessary.
This 2 hour interactive demo includes questions from participants followed by optional 30 minute individualized Confer and Critique Add-On sessions that may be purchased in advance below or at checkout. Additional hour long Confer ‘n Critique sessions may be scheduled by appointment. Please see the recommended supply list below.
For a full hands-on engagement you will need the following:
- A minimal monotype work station complete with a palette, Akua inks and solvents, monotype plate(s), brayer(s) and palette knife(ves)
- Magnesium carbonate powder or Akua Mag Mix
- A sharpie marker
- Various mark making implements to experiment with- pencils with different hardness and sharpness, textured items, be creative.
- A small selection of different papers to experiment with
- Optional: A monotype composition in progress
- A thin and slick paper like wax paper or freezer paper
- Some blue painter’s tape
- A simple printing station- This can be a sturdy flat surface like a table with a glass top. For continued use and registration purposes a grid, some kind of cross-section paper or a simple drawn guide can be put beneath the glass. OR if you already have a press with a registration grid or hand printing station that would be perfect. Check out this short video guide to creating a hand printing station. For some additional info about setting up your studio for whatever level you are at please visit the Materials List.

The art of integrating collage materials within a monotype composition is the focus of this demo. You will learn about the differences between chine colle and collage and the various adhesives we’ll use while working with dry paper. You will see a wide range of uses and methods of application and how to approach the relationship between an ongoing composition and the collage elements you have to work with.
This 2 hour interactive demo includes questions from participants followed by optional 30 minute individualized Confer and Critique Add-On sessions that may be purchased in advance below or at checkout. Additional hour long Confer ‘n Critique sessions may be scheduled by appointment. Please see the recommended supply list below.
For a hands-on engagement you will need the following:
- A Monotype work station complete with a palette, Akua inks and solvents, monotype plates, brayers and other accessories. See the complete list.
- A variety of chine colle’ elements- rice papers, old prints/drawings, photos, photocopied material, digital images, found materials – this is totally open to each participant- Think thin and absorbent.
- One or more of these adhesives: A glue stick, 3M Super 77 spray adhesive, 3M/Scotch Positionable Mounting Adhesive
- A vented or exterior area to spray if using 3M Super 77 spray adhesive
- A cutting and gluing station
- Scrap newsprint and a cutting blade
- One or more sheets of printmaking paper (I use Arches 88 and print dry)
- A press or hand printing station
nd materials – this is totally open to each participant- Think thin and absorbent.One or more of these adhesives: A glue stick, 3M Super 77 spray adhesive, 3M/Scotch Positionable Mounting AdhesiveA vented or exterior area to spray if using 3M Super 77 spray adhesiveA cutting and gluing stationScrap newsprint and a cutting bladeOne or more sheets of printmaking paper (I use Arches 88 and print dry)A press or hand printing station

This online Zoom presentation is the basic introductory lesson I offer in most of my hands-on workshops. It is the best place to start if you have never taken one of my workshops or just need a refresher. Monotype is the most direct of all the printmaking processes – It is a painting on a plastic plate transferred to paper. It is simple to do but extremely rewarding to do well and with a greater level of control. Using Akua water based inks and modifiers participants will learn about the set up and use of materials and tools, the mixing of ink, additive and subtractive techniques, manipulating the plate, the use of stencils and templates, working the ghost, multiple plate registration and of course printing.
My Galisteo Street Studio is a fully functional art – making environment complete with all the tools, inks, and presses that are used by professional printmakers. But you don’t need to have an extensive set up nor do you even need a traditional press to get wonderful results. I will guide you through the process of printing both with the use of a press as well as using a rolling pin or pin press and wooden spoon. Before you know it the beginner will be an advanced student.
This 3 hour interactive demo is suitable to all levels of experience. It includes questions from participants followed by optional 30 minute individualized Confer and Critique Add-On sessions. Additional hour long Confer ‘n Critique sessions may be scheduled by appointment.
In preparation for a full hands-on experience please check out the Materials List.

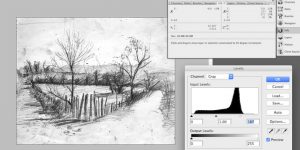
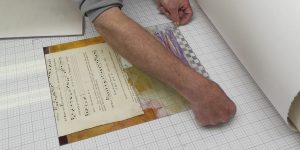
When preparing to make an ImagOn or Solarplate or some other photopolymer plate from a digital image the most important step is the creation of a good transparency. In this demo you will learn the various steps to adjust your image for optimal results.
This 2 hour interactive demo includes questions from participants followed by optional 30 minute individualized Confer and Critique Add-On sessions that may be purchased in advance below or at checkout. Additional hour long Confer ‘n Critique sessions may be scheduled by appointment.